Valentine's Day special shabby romantic tags step-by-step|DT project for Itsy Bitsy
Dear craft-y people,
The season of love is upon us and the latest Valentine's Day releases from Itsy Bitsy have me quite floored!
Today I have two shabby layered tags made using Itsy Bitsy white cardstock, Pretty in Pink linen papers, pigment ink, and Little Birdie Sparkle flowers from the latest release.
To start, grab two ready-made shipping tags or make your own out of cardstock. These gift tags from the store were up at my desk (yes, I loved looking at them) and this was the perfect opportunity to give them a makeover! I traced the shape of the tags on white cardstock and matted each tag on both sides. (Please excuse the distracting background--I was trying to keep my craft mat paste-free!)
 This
white cardstock from the store is just the perfect weight to make
sturdy tags, especially when layered. I distressed the edges of the tag
with a distress tool--scissors work just fine too!
This
white cardstock from the store is just the perfect weight to make
sturdy tags, especially when layered. I distressed the edges of the tag
with a distress tool--scissors work just fine too!
Next, cut pattern paper to mat the tags (I matted only one side) leaving a 1/8th inch margin on all sides. Also tear out a couple pieces of paper from other sheets in the collection. (When ripping paper, ensure the white core shows.) Distress the edges of these pieces.
I used a cake stencil from the store to add texture to the matted tags. (Avoid gluing your pattern paper down edge to edge--leave a narrow margin which you can pluck upwards to add to the shabby look. I missed doing this--lost focus for a bit and burnished my glue too well!) Ha!

Once your modelling paste dries, layer the pieces of pattern paper on. At this point, I edged the pieces with silver pigment ink from the store and lightly stamped them with a script stamp.
Once your tag base is ready, switch on your hot glue gun and break out those lovely trims and flower packs you've been saving for a dreamy shabby project. Here's what I laid my hands on--crochet trims, lace, silver tissue ribbon, Little Birdie Sparkle flowers (Argyle Carnation--IBSC31914 and Carnation Margarita--IBSC31912), Chipboard shapes (Deco Frame and Flower Spray), a metal charm, and a garment pin--all from the store.

I did add paper twine, coffee-dyed gauze, and an eyelet from my stash.
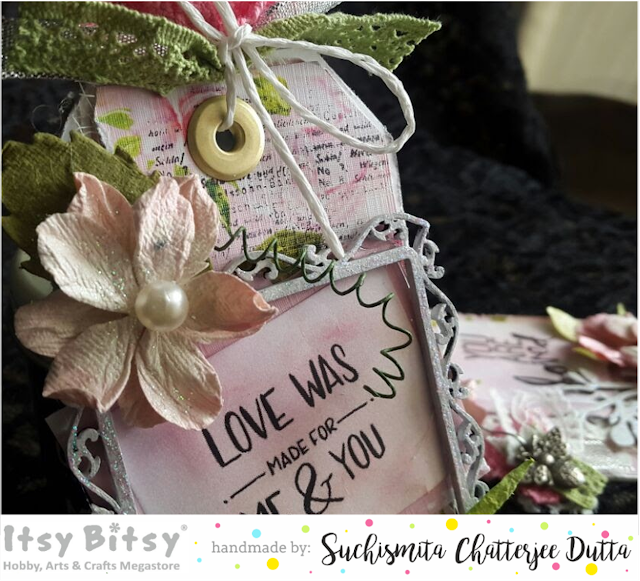
I printed sentiments off the web, layered them on pattern paper, lightly dabbed some Itsy Bitsy pigment ink (Pink) on them to match the papers, and adhered them to the tag with dimensional foam tape. I used hot glue for the rest of the embellishments. I'm sorry I could not shoot the decorating process. Here's what I came up with!


The flowers and leaves are in neat layers--you can easily switch the centers and leaves around. I did just that! One of the flower packs came with a curly tendril--the other, I made (twisting a rose stem around the handle of a paintbrush).


I went over the chipboard shapes with gesso, white acrylic paint, and glitter glue. You can emboss these too (I have no embossing powders yet! Geeesh!)

Look at that honey bee charm! Phew! That one is from the Nyra range of jewelry findings at the store. The garment pin also holds scraps of trims and laces used on the tag.
 That's what I had for today, folks--please let me know if you liked this share! And reach me with any questions.
Thank you for stopping by :)
xoxo,
Suchi
The season of love is upon us and the latest Valentine's Day releases from Itsy Bitsy have me quite floored!
Today I have two shabby layered tags made using Itsy Bitsy white cardstock, Pretty in Pink linen papers, pigment ink, and Little Birdie Sparkle flowers from the latest release.

To start, grab two ready-made shipping tags or make your own out of cardstock. These gift tags from the store were up at my desk (yes, I loved looking at them) and this was the perfect opportunity to give them a makeover! I traced the shape of the tags on white cardstock and matted each tag on both sides. (Please excuse the distracting background--I was trying to keep my craft mat paste-free!)

Next, cut pattern paper to mat the tags (I matted only one side) leaving a 1/8th inch margin on all sides. Also tear out a couple pieces of paper from other sheets in the collection. (When ripping paper, ensure the white core shows.) Distress the edges of these pieces.
I used a cake stencil from the store to add texture to the matted tags. (Avoid gluing your pattern paper down edge to edge--leave a narrow margin which you can pluck upwards to add to the shabby look. I missed doing this--lost focus for a bit and burnished my glue too well!) Ha!

Once your modelling paste dries, layer the pieces of pattern paper on. At this point, I edged the pieces with silver pigment ink from the store and lightly stamped them with a script stamp.
Once your tag base is ready, switch on your hot glue gun and break out those lovely trims and flower packs you've been saving for a dreamy shabby project. Here's what I laid my hands on--crochet trims, lace, silver tissue ribbon, Little Birdie Sparkle flowers (Argyle Carnation--IBSC31914 and Carnation Margarita--IBSC31912), Chipboard shapes (Deco Frame and Flower Spray), a metal charm, and a garment pin--all from the store.

I did add paper twine, coffee-dyed gauze, and an eyelet from my stash.
I printed sentiments off the web, layered them on pattern paper, lightly dabbed some Itsy Bitsy pigment ink (Pink) on them to match the papers, and adhered them to the tag with dimensional foam tape. I used hot glue for the rest of the embellishments. I'm sorry I could not shoot the decorating process. Here's what I came up with!


The flowers and leaves are in neat layers--you can easily switch the centers and leaves around. I did just that! One of the flower packs came with a curly tendril--the other, I made (twisting a rose stem around the handle of a paintbrush).


I went over the chipboard shapes with gesso, white acrylic paint, and glitter glue. You can emboss these too (I have no embossing powders yet! Geeesh!)

Look at that honey bee charm! Phew! That one is from the Nyra range of jewelry findings at the store. The garment pin also holds scraps of trims and laces used on the tag.

Thank you for stopping by :)
xoxo,
Suchi


These are just lovely!
ReplyDeleteThank you so much, Tragicomic <3
ReplyDeleteThese tags are soo cute.....
ReplyDeleteThanks for sharing such a lovely idea....
Hugs, UrooCreations
Thanks a bunch, Uroo Creations...apologies for the massive delay in my response!
Delete