"To have and to hold" summer romance shabby chic mini album a la Ginger
Hello there, friends!

I have to admit, I avoided this brand of designer paper for the longest time, (I felt they lacked a story or a theme) until I fell hard for the muted shabby florals in this paper pad. I am so happy I picked these papers up! I bought a 12x12 inch paper pad with 24 sheets of designer paper and three sheets of die-cuts/stickers, and the best part is--I have paper left for another tiny mini!

That is not so bad...considering how paper-intensive this page style is--and I packed in a whole lot of extra inserts too.
Here are pictures from my table before I started the project. I originally planned to finish this project in a day! That turned out to be too ambitious--especially when it's a hundred degrees outside (technically, only 40 degrees Celsius though)--but I did have the outer cover, the hinge, and the base pages ready at the end of the first day.


This album, (again!) features one of Ginger's amazing tutorials. Hop on over to her YouTube channel and you will be hooked! Watch Ginger's Thursday Tutorial - Twas The Night Before Christmas Mini Album Page for the page design I used here.
I used Laura Denison's Stack the Deck binding system for this album--increased the gusset width to 1/2 an inch from the original 3/8th of an inch. With six spots for pictures on each page, and given the 240 gsm cardstock I used, I feel the pages will bulk up when pictures are added. I wanted to give each page enough room to expand :)

Going with the shabby floral papers, I decided to not give this album a vintage look--and picked the no-ink, all-white base instead. It was quite a shift for me, given what a lover of vintage I am. It was difficult to not ink all my edges and load the pages with oxidized metal. But, I held back...and the results are for you to see.
The front cover: I added a layer of mesh on the design paper before starting to form the cluster in order for it to have a gauzy softness. The wooden flourish has been painted with gesso, and the album title is a Prima stamp from the Something Blue collection. I added a butterfly sticker from the collection and pearl sprays and flowers from my stash.

The spine:

I went easy on the charms--because I was dying to break out my pack of Tim Holtz Ideology jump rings, and did not want this one to give in under the weight of a heavy charm dangle. Isn't it a beauty?
The back cover:


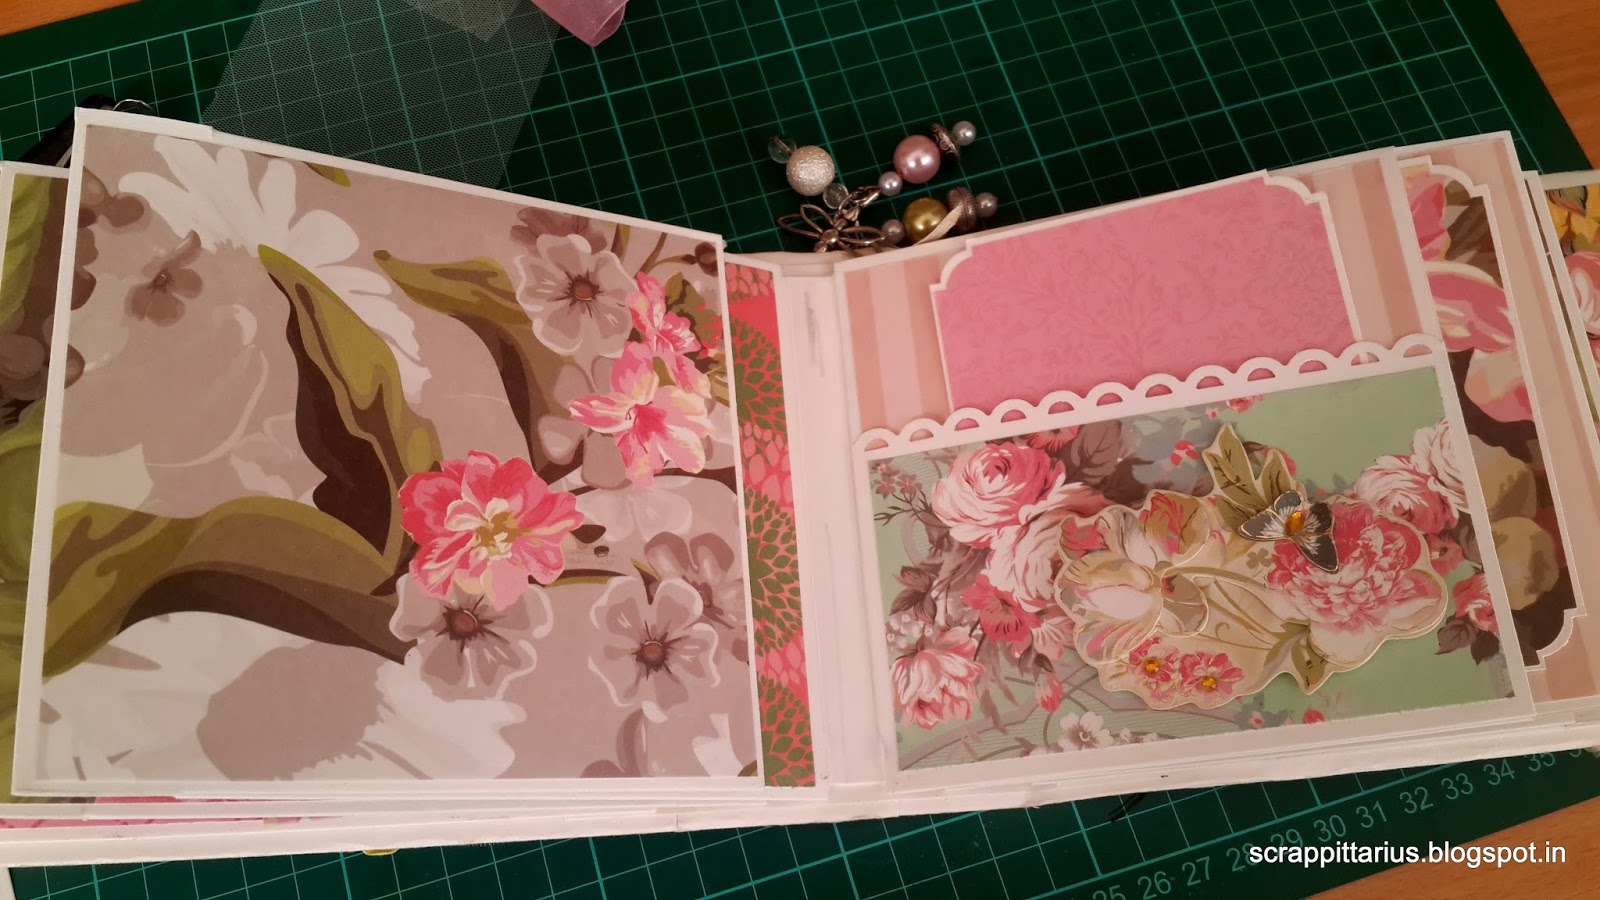
The mini has four page units with 6 photo spots each--two on-the-page photo areas and four photo-mat inserts.
As my city sizzles in the summer heat, I cooked up this pink confection which, to me at least, feels like an oasis of cool summer colors--baby yellows and pinks, soft beige, mint green, and cool gray.
This album is a gift for a coworker who is about to celebrate her first anniversary early next month. I hope she likes it!
This album is a gift for a coworker who is about to celebrate her first anniversary early next month. I hope she likes it!

I have to admit, I avoided this brand of designer paper for the longest time, (I felt they lacked a story or a theme) until I fell hard for the muted shabby florals in this paper pad. I am so happy I picked these papers up! I bought a 12x12 inch paper pad with 24 sheets of designer paper and three sheets of die-cuts/stickers, and the best part is--I have paper left for another tiny mini!

That is not so bad...considering how paper-intensive this page style is--and I packed in a whole lot of extra inserts too.
Here are pictures from my table before I started the project. I originally planned to finish this project in a day! That turned out to be too ambitious--especially when it's a hundred degrees outside (technically, only 40 degrees Celsius though)--but I did have the outer cover, the hinge, and the base pages ready at the end of the first day.


This album, (again!) features one of Ginger's amazing tutorials. Hop on over to her YouTube channel and you will be hooked! Watch Ginger's Thursday Tutorial - Twas The Night Before Christmas Mini Album Page for the page design I used here.
I used Laura Denison's Stack the Deck binding system for this album--increased the gusset width to 1/2 an inch from the original 3/8th of an inch. With six spots for pictures on each page, and given the 240 gsm cardstock I used, I feel the pages will bulk up when pictures are added. I wanted to give each page enough room to expand :)

Going with the shabby floral papers, I decided to not give this album a vintage look--and picked the no-ink, all-white base instead. It was quite a shift for me, given what a lover of vintage I am. It was difficult to not ink all my edges and load the pages with oxidized metal. But, I held back...and the results are for you to see.
The front cover: I added a layer of mesh on the design paper before starting to form the cluster in order for it to have a gauzy softness. The wooden flourish has been painted with gesso, and the album title is a Prima stamp from the Something Blue collection. I added a butterfly sticker from the collection and pearl sprays and flowers from my stash.

The spine:

I went easy on the charms--because I was dying to break out my pack of Tim Holtz Ideology jump rings, and did not want this one to give in under the weight of a heavy charm dangle. Isn't it a beauty?
The back cover:


The mini has four page units with 6 photo spots each--two on-the-page photo areas and four photo-mat inserts.
Here are the inserts:

Now on to the pages :D

Now on to the pages :D
Page 1


I altered a paper clip and used it to attach a tiny envelope to the pocket.

Oh yes, I have recently bought myself my first Spellbinders Nestabilities die set--the Labels 1 dies--which you see featured here.

The envelope holds tiny journaling cards.
Pages 2-3

Pages 4-5

Pages 6-7

Page 8

A four-page booklet insert for the inside back cover:

And here are the fold-out pages for each page unit:
Page 1-2


Pages 3-4


Pages 5-6


I altered a paper clip and used it to attach a tiny envelope to the pocket.

Oh yes, I have recently bought myself my first Spellbinders Nestabilities die set--the Labels 1 dies--which you see featured here.

The envelope holds tiny journaling cards.
Pages 2-3

Pages 4-5

Pages 6-7

Page 8

A four-page booklet insert for the inside back cover:

And here are the fold-out pages for each page unit:
Page 1-2


Pages 3-4

Pages 5-6


Pages 7-8


Tags and inserts:

I did also use coordinating stickers and metal embellishments, along with the paper pad. All handmade flowers you see here are from Itsy Bitsy. The organza ribbons are from Premier Ribbons (find them on FB!).
And here is the video flip-through! Make yourself a coffee/tea and join in!
So there! My shabby little summer romance mini album. <3

Thank you so much for visiting my blog today! If you like my work, please leave me a line--I would much appreciate it :)
More soon!
xoxo
Suchi


This is so delicate, ethereal, beautiful. I love what you did with the paper clip as well as the spine. Using one of the stamps from the Something Blue collection was a brilliant way to give this album a title. All very lovely.
ReplyDeleteOMG, thank you so much, Tragicomic! The title...yeah i am glad i chanced upon this idea--was quite at a loss because I had no chipboard words to go on the cover, or a stamp big enough.
DeleteSo glad you like this album!
Loved it....Loved how u have given every minute details...
ReplyDeleteBeautiful :-) <3
Thank you so much for stopping by and leaving a note, Sampada. Means a huge lot! Uploaded the video today--let me know how you like it! xx <3
Delete